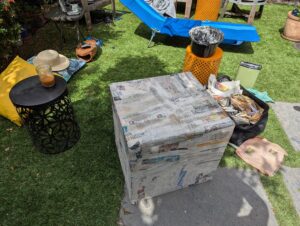
I love to make paper maché piñatas and recently have been working on some cardboard and paper mache furniture. It is relaxing because it isn’t writing and isn’t a computer, hurrah! The furniture is a large cardboard box that my parents had been using as a patio table after moving into their new condo. My mom liked it because it is super light weight and the perfect height for her morning coffee. But guess what, someone complained to the HOA that it looked trashy!
Thus my giant plan to paper mache this 2 and a half foot square box. I added some extra cardboard inside for structural support, but unfortunately only along the edges. Now I wish I’d folded a piece zig-zag and taped it into the middle so the middle wouldn’t sag. Oh well! The two saggy sides just shouldn’t be the ones facing up and there are other flatter bits to be the surface of the table. To add a little extra smoothness I am going to experiment with a thin layer of drywall stuff (left over by our contractors). Then, sand it lightly by hand, then seal it with some spar varnish (against mice and damp), then spray paint, then probably I’ll do another layer of spar varnish.
If all goes well, it will look classy as fuck but we will know that inside, it’s still the same damn box!!
Meanwhile on the collage and decoupage front! I used to make collages for zines and flyers and have an old clippings file somewhere in the basement, but I thought I’d make a new one file and run a drop-in workshop at the SF Disability Cultural Center in a couple of weeks. I have a call out on the neighborhood free exchange group for magazines but in the meantime I cut up an old New Yorker that someone put into my little free library. and then figured I would write a little how-to for decoupaging. It may not be the 100% best way, but here is what I do!
The basic idea is you are going to make a collage, but are going to utterly saturate and cover it with tough clear glue, to form a durable coat on top.
Supplies to gather
* scissors
* glue – school or wood glue is ok but Mod Podge is great!
* paper (see below for tips on gathering paper)
* scrap newspaper or sheets of scrap paper (to protect your table)
Optional supplies that will make your life easier
* a glue stick
* a repositionable glue stick! (special !)
* an exacto knife
* Bandaids (hahahah oops)
* wax paper (very useful for putting under your object while gluing)
* a brush, small bits of sponge, a rag, a wet rag
1. Get some colorful or interesting bits of paper
This can be magazines, colored tissue paper, origami paper, wrapping paper, newsprint, napkins, concert programs, flyers, ticket stubs, or other ephemera. Anything is good. Thick glossy cardstock can even work. You can print things from the internet, or draw something yourself.
2. Get a file folder or envelope or two to hold your clippings.
This doesn’t have to be anything special. I like big flat mailer envelopes, which I save sometimes from mail I get, but you can also just grab one free at the post office. A manila folder or two will fit inside it! Or you can use smaller mailing envelopes or just a piece of paper folded in half to hold your clippings inside the big envelope.
3. Cut up your magazine(s)
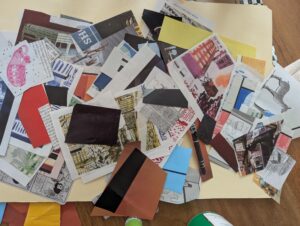
Cut out anything colorful. A big advertisement may have areas of interesting color. I generally cut around the bits that have people and words, and snip out the scraps of plain colors or patterns. Words can be fun too but you really want to build up a variety of colors and shapes! Put it all in your clippings folder and envelope!
It took me maybe 10-15 minutes to cut everything nifty out of this New Yorker — and here it is:
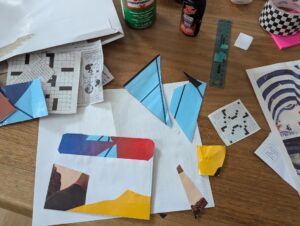
4. Start your layout
You might have a look at your clippings and the thing you are going to decorate, and pick out a few colors, patterns, or decide on some kind of theme. Then start with large pieces first, and add smaller pieces afterwards. You can tack paper down with a little bit of glue stick to start with.
I used some scrap printer paper underneath my project to avoid getting glue all over the table but then switched to wax paper so that my table-protecting layer wouldn’t stick to the project. Wax paper works really well (or parchment paper).
5. Saturate and cover with ModPodge!
Once you get a bunch of it done or have covered one surface, slap on your Mod Podge or other clear glue. If your paper is lightly tacked down, or is thick, then re-glue its underside. If it is already nicely attached or it’s very thin paper like from a magazine, slather the glue on top and let it soak through.
I actually use my fingers for this because I don’t mind being grubby and I like the sense of fine control and being able to smooth it all down. (Do wash your hands or clean them off on a damp rag after the glueing!) But you can also use a small bit of kitchen sponge (tear or cut it up ) or a bit of rag, or an actual paintbrush to apply the glue.
5. Let it dry completely
Don’t touch it while it’s drying or the color might come off onto your fingers!
After it is dry, you could add another layer of Mod Podge or glue if you like, or coat it with some other clear stuff. If you want it to be super tough and weatherproof, look into different kinds of top coats!
Or, you might need to flip it over (onto wax paper!) and decoupage or decorate the other side.

The actual decoupaging step for one side of this envelope was about 10 minutes. I decided to stick to a few colors and big pieces for the background and then slap a little crossword puzzle solution on top. (An unsolved puzzle design will go on the back of the envelope later!) I opened the flap of the envelope to cover it too, which meant putting wax paper inside the envelope was crucial so the flap wouldn’t stick to things it shouldn’t.
I like how it came out!
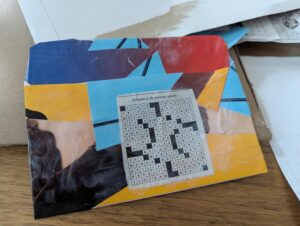
I may add a fastener to the flap, or leave it open and use it as a sticker pouch in my wheelchair side pocket.
Small envelopes like this are also great if you decorate the “open” side and then glue the “front” side (undecorated) into the back cover of a journal or blank notebook for a nice little pocket.