My mobility scooter has a lever which when pressed moves the scooter forward or backward. There aren’t any brakes; I stop by taking my hand off the lever. So in order to keep moving I have to keep pressing this lever. Over time, that hurts my hand and arm. It’s also just tedious! So I wanted to copy what my friend Zach had done and build a switch that would keep the scooter moving. He said it was pretty easy. I took the front casing off my scooter dashboard to see what it looked like in there. Kind of scary, a tangle of wires. If I messed it up, I’d be stuck. I put it back together unwilling to experiment till I talked with someone who knew what they were doing.
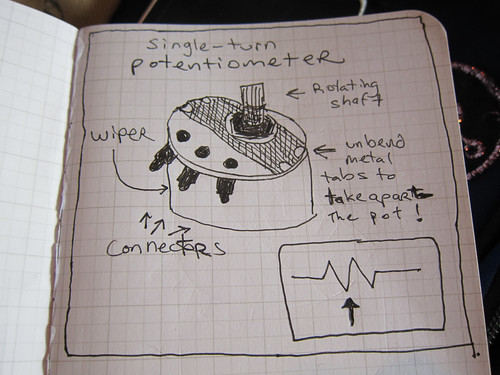
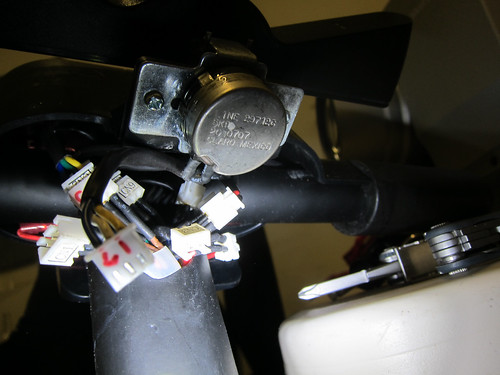
When Zach and I looked at it we took that cover off again and set it aside. The wires were in clusters of three with easily detachable connectors, labelled CN1, CN2, CN3, and so on. CN3’s cluster of wires went to the keyhole, which I could see is very simple. In fact I would bet I could stick an audio jack or some other piece of round metal into the hole and start the scooter. CN2 went to the potentiometer that sits between the levers for forward and back. In other words that lever moves a precision screw that goes into the potentiometer to change the resistance going from the battery to the motor. CN1 went to the forward and reverse lever, and that’s where we wanted to put my switch. We labelled some of the connectors with a Sharpie.
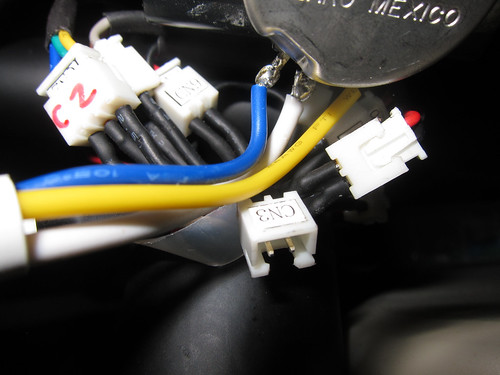
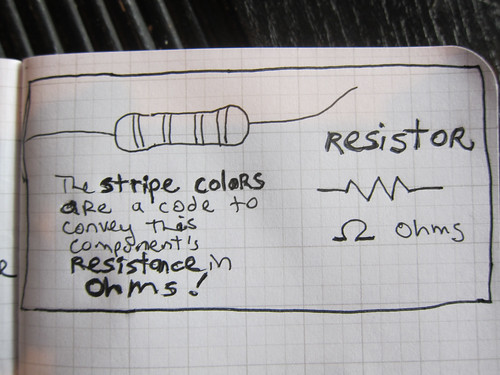
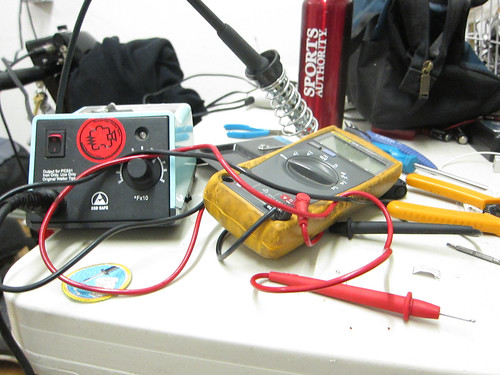
The existing potentiometer was 5k Ohms (it said this on the bottom of the part.) There were three wires going to it; white, yellow, and blue. Yellow went to the forward lever. Blue went to the reverse lever. White was the wire they had in common. Between the white and yellow wire we measured 800 ohms. Between White and blue we measured 4K8 ohms. We would need to duplicate that with the new switch.
Rummaging around in the hack shelves and bins and tiny drawers in Noisebridge we found two potentiometers with tiny screws that Zach pointed out were very finely adjustable. Precision trimmable potentiometers or trim pots. We ended up using one for the 4K8 and one for the 800 side of our switch.
Here are the tiny drawers and bins we looked through! Imposing, aren’t they?

And the Pile O’ Junk that overflows from the hack shelves:

We found several switches, none ideal, and none that looked easily mountable on my scooter’s dashboard. Jake, who is great at electronics stuff and builds robots, immediately found us the right thing, a single throw double pole switch. The switch looks like a little bug with 6 legs — the connectors we soldered wires to — and the flippable part of the switch sticking up from its back. Here it is all wired up, before the hot glue went on.

We replaced one of the duplicate blue wires with white. (Which I found by rummaging in the hack shelves and bins.)
We realized at some point that the resistance didn’t match up perfectly because we had measured it all while the trimpots and switch was unmounted from the wires but we needed to measure and adjust the trimpot screws while it was connected.
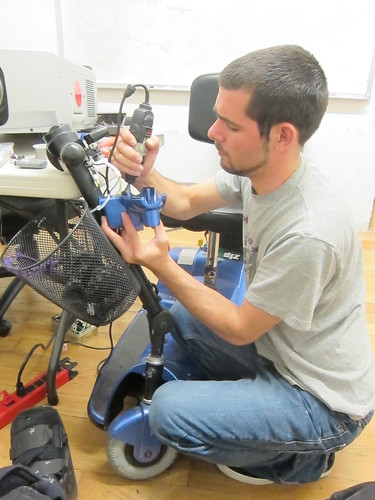
Before we hot glued and mounted everything we put a 2×4 under the center of the scooter to prop it up for testing – so that the wheels could spin without the scooter going anywhere. It worked great when we flipped the switch! Very exciting!
We then dabbed hot glue over the switch and some of the other connections with a glue gun. The glue is kind of rubbery and would peel away easily. It should stop the solder from jolting loose, though.
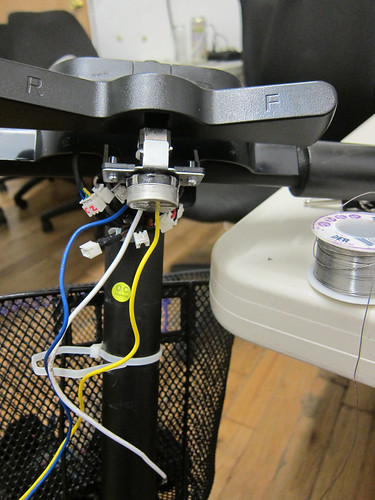
When we went to mount the switch, we realized it stuck out further back than we had room for in the plastic casing. But it would fit really well in the area for the keyhole mechanism, which was shorter. We ended up drilling a new hole for the key hardware on the lower right of the dashboard, and enlarging the former key area to fit the switch. This took a little bit of adjusting and re-drilling with the dremel while we held the front of the plastic case in place. It was very useful to have four hands. My extremely bright LED flashlight came in handy at this stage.
Along the way we also replaced and added some washers to hold everything in securely. It was great to have access to all the tiny bits of hardware that Noisebridge has free for the hacking and to all the tools in the shop and electronics lab.
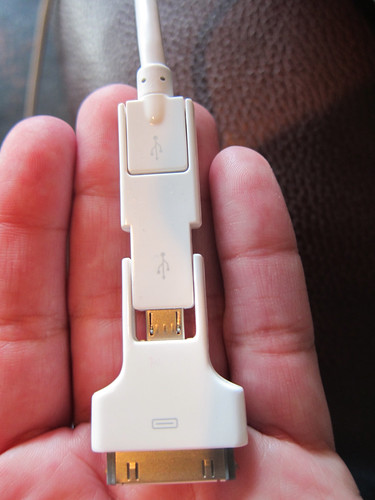
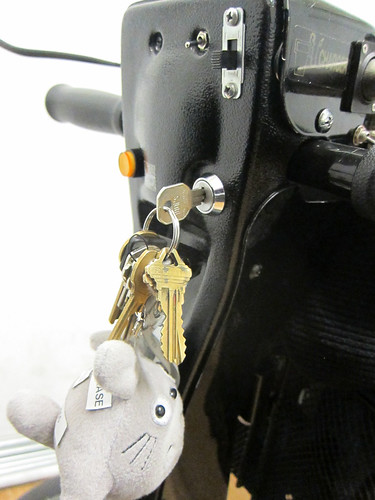
Thanks so much to Zach for the awesome tutorial on potentiometers and resistance in circuits, and for the hacking help! You can see part of his super slick dashboard here, with cruise control switch, usb port, and other useful charging ports as well as a cute Totoro keychain.
By installing “cruise control” I basically bypassed a crucial safety mechanism of my scooter. I am trying, each time I flip that switch, to repeat to myself over and over, TO STOP, FLIP THE SWITCH. Three times now in the past few days I have forgotten it is on, pressed the lever automatically with my right hand while cruising; then taken my hand off the forward lever only to be unpleasantly surprised that I don’t stop. (Until I crash into things.) On day 1 I was super careful. On day 2 I was lifting up my backpack while stopped, and the backpack strap caught on the switch. I went barrelling forward to crash into Noisebridge’s media cart and a lot of chairs. Everyone laughed. NOT GOOD. Luckily, only one thumb and my dignity were wounded. Day 3, I had my hand on the forward lever and was stopping on the sidewalk. Except I didn’t stop! I was about to hit both a curb and a knot of pedestrians and all I could do was crash myself into a pole. That worked and I yanked out the key and flipped the switch in a giant panic. So, after that I did a lot more deliberate practice with a “the switch is on” mantra. Any time I am near people, or an intersection, I go back to manual control.
I also plan to build a little shield for the switch from Sugru to prevent accidentally flipping it. It needs labelling as well; when I took my scooter on the airplane yesterday I spent some time explaining DO NOT USE THE SWITCH to the airline cargo laoders at the gate until they were so scared of my “TURBO MODE” that they gave me back the key and carried the scooter onto the plane.

Next I want to move the keyhole to a spot on top of the dashboard instead of under it, and stick some LEDs and an arduino in there with its usb port sticking out for programming, and some sort of complicated dial so I can make different things happen with blinky lights on the front of the scooter….